Hope you all had a fabulous holiday and new years!
The Angry Chef and I spent New Year’s Eve nestled in with the good folks from The Salem Insider and Rippin Kitten.
The company was outstanding. There was a roaring fire in the hearth. We had a handful of toasty cocktails. Honestly, I couldn’t think of a better way to ring in the new year.
I only have one piece of unfinished business from 2009—and that’s where these tartlettes come in. I promised you guys the recipe for them a few weeks ago.
How do you decide what to bake for the editors of Bon Appetit?
That’s a toughie, right?
So, last month, you might remember that Bon Appetit invited us to head down to New York City for its Holiday Bake-Off Party. I was squeeking and tweeting about it for weeks.
December was really snowy, so I spent the first part of the month combing through my notebooks, going through ideas that ranged from cheesecakes to bundt cakes to all sorts of bon bons.
I spent a lot of time musing out my kitchen window about what to bring. (What would travel well on the train, what would be impressive enough, etc.)
After what seemed like an endless amount of fretting (I mean, come on: One of the judges was pastry chef Francois Payard), I settled on making my favorite Chocolate Caramel Tart in miniature form.
This post will give you a look at how I did that.
Praise for my tartlette pans
I used a bunch of these little guys (Wilton Nonstick 4 Inch Tartlette Pans). I can’t say enough about them. They don’t stick, they’re a perfect individual size, and they’re nice and sturdy.
Scaling a recipe sounds easy, right?
Sure. In theory.
Scaling this particular recipe wasn’t that hard, but it wasn’t as easy as you might think. It’s always a tricky thing when you try to make a recipe fit another size pan.
It took me a little while to figure out how to get the crusts just the right thickness.
(Little did I know that Payard would focus on the thickness of my crust. You gotta hand it to Lee Zalben for comparing the famous patissier to Simon Cowell in his article for Serious Eats.)
My first shot at filling the tart shells was waaaaaaay too thick.
I baked a few more batches, and whittled the thickness of the crust down considerably each time.
And, after fiddling around with the amount of dough in each pan, I think I got it just right. (My apologies, Monsieur Payard, but all my tasters agreed that this tart wants a slightly thicker crust to offset all that gorgeously gooey filling.)
On your mark, get set, bake (and bake, and bake…)!
So, I loaded the fridge with enough heavy cream and butter to keep an army of mice in tea and crumpets for a month, and started to practice.
I went through an obscene amount of butter.
And as delicious as these are, I don’t want to see another tart for a month. After baking dozens of them, I’m all set for now.
Notes
- This recipe makes 9 or 10 (4-inch) tartlettes, depending on how thick/thin you make the crust.
- Oh, also. My pictures below are a compilation of many (many, many) series of test tartlettes, so don’t go counting egg yolks looking for inconsistencies.
- For a complete step-by-step walkthrough of this technique, take a peek at how to make the larger version of this tart.
Chocolate Caramel Tartlettes
Adapted from Saveur magazine (this is the original recipe, doubled)
Crust
3 cups flour
10 Tbls. unsweetened cocoa powder (not sweetened hot chocolate mix)
1/2 tsp. kosher salt
20 Tbls. butter, diced and softened
1 1/4 cup confectioner’s sugar
4 egg yolks
1 tsp. vanilla
Caramel
3 cups sugar
6 Tbls. light corn syrup
12 Tbls. water
1/2 tsp. kosher salt
12 Tbls. butter
3/4 cup heavy cream
2 Tbls. creme fraiche
Ganache
1 cup heavy cream
8 oz. bittersweet chocolate, finely chopped
French Grey sea salt, for garnish
Yields 9-10 (4-inch) tartlettes
Preheat your oven to 350 degrees. Grease your tartlette pans and set them aside.
Make those pesky tartlette shells
Put the butter and confectioner’s sugar in the bowl of your mixer (or in a large mixing bowl if you’re mixing with a handheld, electric mixer.) Mix well until you have a smooth paste.
Toss in the egg yolks and vanilla. Beat til incorporated and fluffy looking.
Add the flour, cocoa powder, and kosher salt. Beat quickly until well combined.
(This is where the experimenting began.)
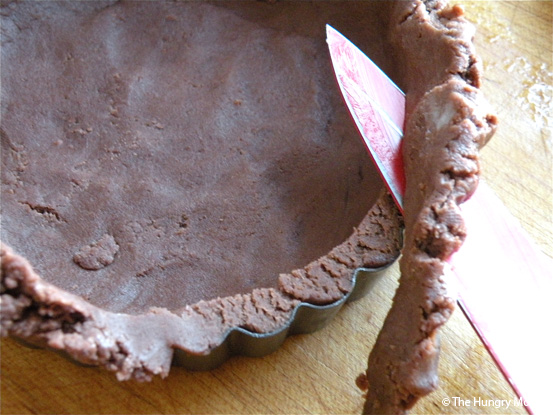
Flatten out your dough into a large round. Whack the dough into 10 pie slices with a pastry bencher or a large knife, just like you’re cutting a pizza. Don’t make yourself crazy. You’re just trying to divide the dough up into fairly even pieces.
Take one piece of dough and put it into a greased tartlette pan. Using your hands, smoosh it around so that it lines the pan completely in a thin layer.
Your dough will pop up over the edges of the pan a little.
Trim the excess dough off the top with a sharp paring knife.
Set the trimmings aside for now.
Smooth down the top edge a little, and be sure that the dough is fitted into the fluted edge of the pan.
You want the bottom crust to be about this thick. Just dig a little hole with your finger to check the thickness. You can smoosh the dough right back into place when you’re done.
Repeat with the rest of the dough, until all your tartlette pans are lined. With a fork, prick the dough all over on each tartlette. (These holes will allow steam to escape as the crusts bake�which helps keep them flat.)
Bake in your pre-heated 350 degree oven for about 20 minutes, until lightly browned.
Let them cool for about 15 minutes in the pans, then slip them out (carefully) and finish cooling on a rack.
If you don’t have enough dough to make an extra tartlette, roll the dough out, cut it into squares, and bake for about 15 minutes for cookies. (Want to be sinful? Dip them in dark chocolate.)
Make the caramel
Make the caramel according to my original instructions.
Ladle the caramel into the cool tartlette shells, until it just about reaches the top. (Leave maybe an 1/4 of an inch or so.) Chill for 4 or 5 hours.
Make the chocolate ganache
Make the ganache using the original method, and carefully spoon it on to the hardened caramel, spreading it to the edges.
Pop them into the fridge to set up for another 4 or 5 hours.
Make the candied orange peel
Lastly, I chose to garnish these tartlettes with thin slivers of candied orange peel. I made the peel according to this recipe.
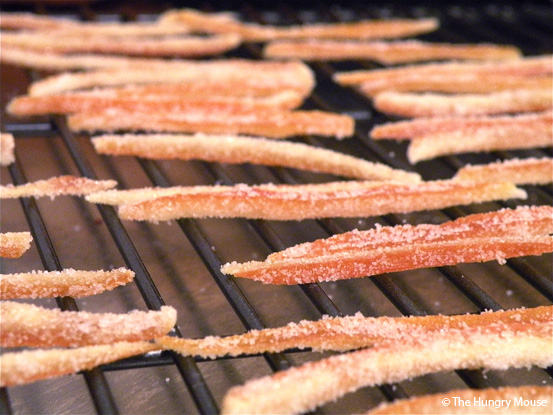
After it had dried overnight, I sliced it into thin strips and tossed it in a little more sugar. (I did it this way because I can never get paper thin strips of peel to candy properly without falling apart.)
I set those thinner strips on a rack to dry for a few hours.
Then I bundled them together to take to NYC.
And, voila!
Here are the final tartlettes, garnished with gray sea salt and slivers of orange peel.
And that about completes my report on my adventure to Bon Appetit’s offices in New York. Like I said, it was a pleasure to go, and a pleasure to come home.
After all, we have a lot of treats planned for you this year. I’d better get cooking.


